目录
一.简介
二.常用接口
三.实战演练
1.径向渐变
2.QSS贴图
3.开关效果
4.非互斥
一.简介
QRadioButton控件提供了一个带有文本标签的单选按钮。
QRadioButton是一个可以切换选中(checked)或未选中(unchecked)状态的选项按钮。单选按钮运行用户多选一,也就是说,在一组单选按钮中,每次只有一个能选中,如果用户选择了另一个,那么之前那个就会切换到未选中状态。
单选按钮默认开启自动互斥(autoExclusive)。如果启用了自动互斥,属于同一个父部件的单选按钮的行为就和属于一个互斥按钮组的一样。如果你需要为属于同一父部件的单选按钮设置多个互斥的按钮组,把它们加入QButtonGroup中。
当按钮切换选中或未选中状态时,会发出的toggled()信号。如果希望每个按钮切换状态时触发一个动作,连接到这个信号。使用isChecked()来判断特定按钮是否被选中。
就像QPushButton一样,单选按钮可以显示文本,以及可选的小图标。图标使用setIcon()来设置,文本可以在构造函数或通过setText()来设置。可以通过在文本中某个字符前添加一个&来指定快捷键。
二.常用接口
void setAutoExclusive(bool)
继承自基类QAbstractButton,用于设置是否互斥。
三.实战演练
由于本次QSS代码较多,故将QSS代码放到了skin.qss文件中。
1.径向渐变
单选按钮默认是下面这样子的:

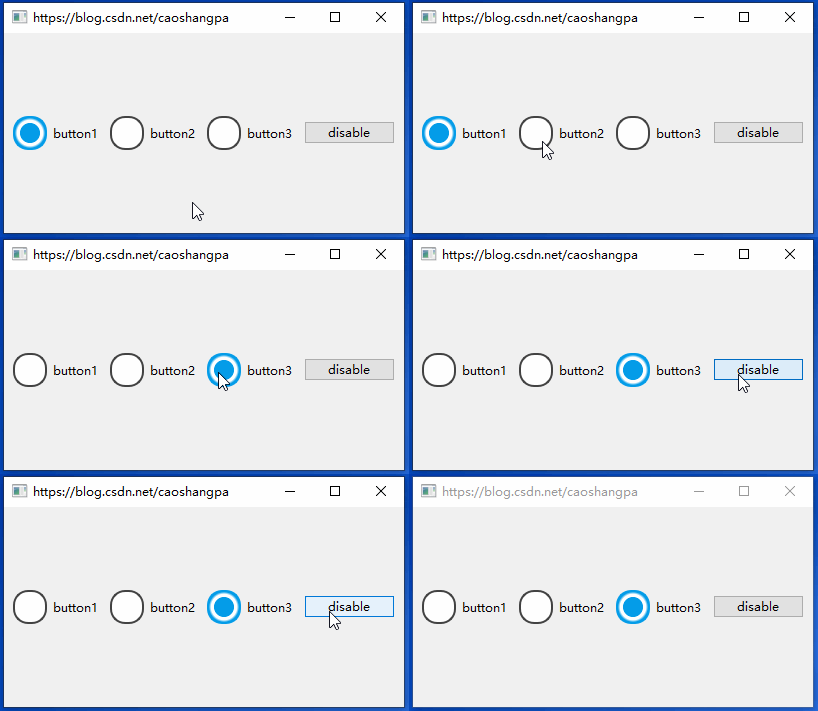
径向渐变(qradialgradient)在围绕它的圆上的焦点和终点之间插值颜色,可以很容易模拟出中心圆点+圆形边框的选中效果。渐变不仅在QSS中有妙用,在绘图时也不可或缺,后面会用一篇博客专门介绍。

#include#include #include #include #include #include int main(int argc, char *argv[]) { QApplication a(argc, argv); a.setStyleSheet("file:///:/qss/skin.qss"); QMainWindow w; w.setWindowTitle("https://blog.csdn.net/caoshangpa"); QWidget *centralWidget = new QWidget(); QHBoxLayout *hLayout = new QHBoxLayout(); QRadioButton *button1 = new QRadioButton(); button1->setText("button1"); button1->setChecked(true); QRadioButton *button2 = new QRadioButton(); button2->setText("button2"); QRadioButton *button3 = new QRadioButton(); button3->setText("button3"); QPushButton *button4 = new QPushButton(); button4->setText("disable"); QObject::connect(button4, &QPushButton::clicked, [=]{ if (button4->text() == "disable") { button1->setEnabled(false); button2->setEnabled(false); button3->setEnabled(false); button4->setText("enable"); } else { button1->setEnabled(true); button2->setEnabled(true); button3->setEnabled(true); button4->setText("disable"); } }); hLayout->addWidget(button1); hLayout->addWidget(button2); hLayout->addWidget(button3); hLayout->addWidget(button4); centralWidget->setLayout(hLayout); w.setCentralWidget(centralWidget); w.resize(400, 200); w.show(); return a.exec(); }
QSS
QRadioButton
{
    color: black;
}
QRadioButton:disabled
{
    color: gray;
}
QRadioButton::indicator
{
    width: 30px;
    height: 30px;
    border-radius: 15px;
}
QRadioButton::indicator:checked
{
    background-color: qradialgradient(spread:pad, cx:0.5, cy:0.5, radius:0.5, fx:0.5, fy:0.5, stop:0 rgba(4, 156, 232 ,255), stop:0.6 rgba(4, 156, 232 ,255),stop:0.65 rgba(255, 255, 255, 255), stop:0.8 rgba(255, 255, 255, 255), stop:0.95 rgba(4, 156, 232, 255), stop:1 rgba(4, 156, 232 ,255));
    border: 2px solid rgb(4, 156, 232);
}
QRadioButton::indicator:unchecked
{
    background-color: white;
    border: 2px solid rgb(66, 66, 66);
}
QRadioButton::indicator:unchecked:disabled
{
    background-color: rgb(213, 213, 213);
    border: 2px solid  rgb(200, 200, 200);
}
QRadioButton::indicator:checked:disabled
{
    background-color: qradialgradient(spread:pad, cx:0.5, cy:0.5, radius:0.5, fx:0.5, fy:0.5, stop:0 gray, stop:0.6 gray,stop:0.65 white, stop:0.8 white, stop:0.95 gray, stop:1 gray);
    border: 2px solid gray;
}
2.QSS贴图
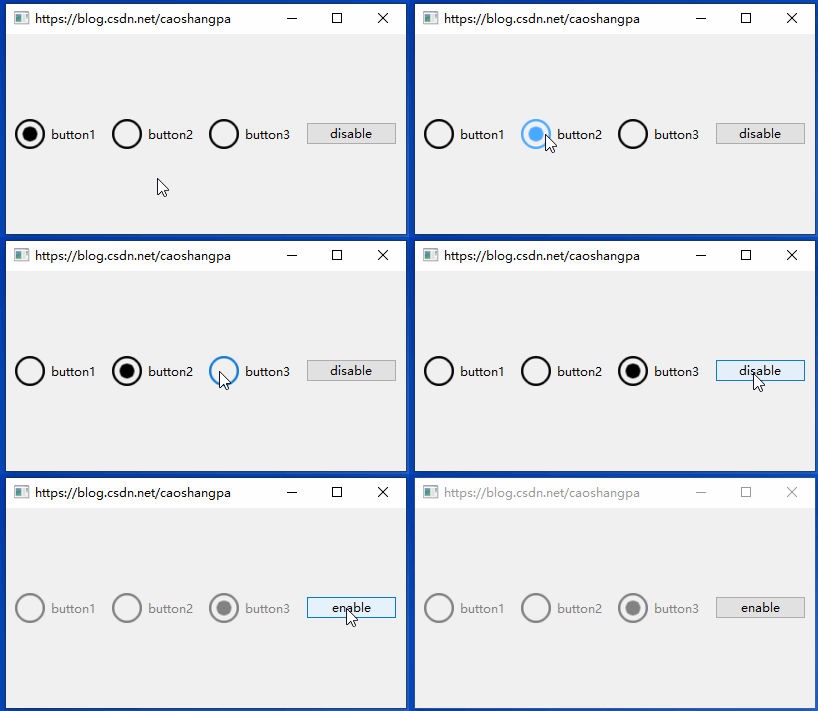
除了使用径向渐变,QSS贴图也能实现相同的效果。

用到的图片如下:


C++代码一样,这里只贴QSS代码
QRadioButton
{
    color: black;
}
QRadioButton:disabled
{
    color: gray;
}
QRadioButton::indicator
{
    width: 30px;
    height: 30px;
    border-radius: 15px;
}
QRadioButton::indicator::unchecked {
    image: url(:/icons/radiobutton_unchecked.png);
}
QRadioButton::indicator:unchecked:hover {
    image: url(:/icons/radiobutton_unchecked_hover.png);
}
QRadioButton::indicator:unchecked:pressed {
    image: url(:/icons/radiobutton_unchecked_pressed.png);
}
QRadioButton::indicator::checked {
    image: url(:/icons/radiobutton_checked.png);
}
QRadioButton::indicator:checked:hover {
    image: url(:/icons/radiobutton_checked_hover.png);
}
QRadioButton::indicator:checked:pressed {
    image: url(:/icons/radiobutton_checked_pressed.png);
}
QRadioButton::indicator:checked:disabled
{
    image: url(:/icons/radiobutton_checked_disabled.png);
}
QRadioButton::indicator:unchecked:disabled
{
    image: url(:/icons/radiobutton_unchecked_disabled.png);
}
3.开关效果
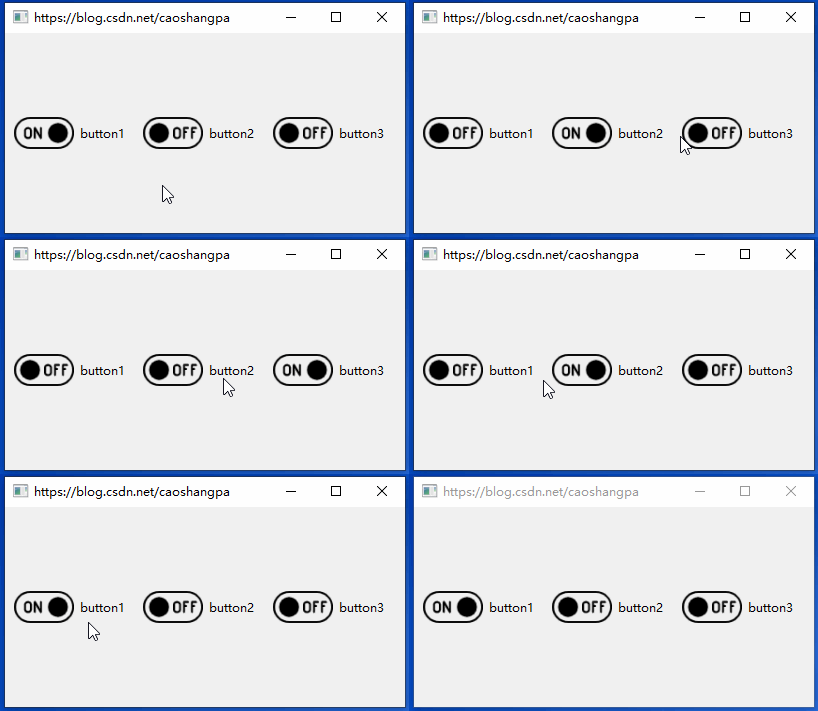
我们来实现一个iphone中常见的开关效果,其实也是QSS贴图。

用到的图片如下:


QRadioButton
{
    color: black;
}
QRadioButton:disabled
{
    color: gray;
}
QRadioButton::indicator
{
    width: 60px;
    height: 60px;
    border-radius: 30px;
}
QRadioButton::indicator::unchecked {
    image: url(:/icons/off.png);
}
QRadioButton::indicator::checked {
    image: url(:/icons/on.png);
}
4.非互斥
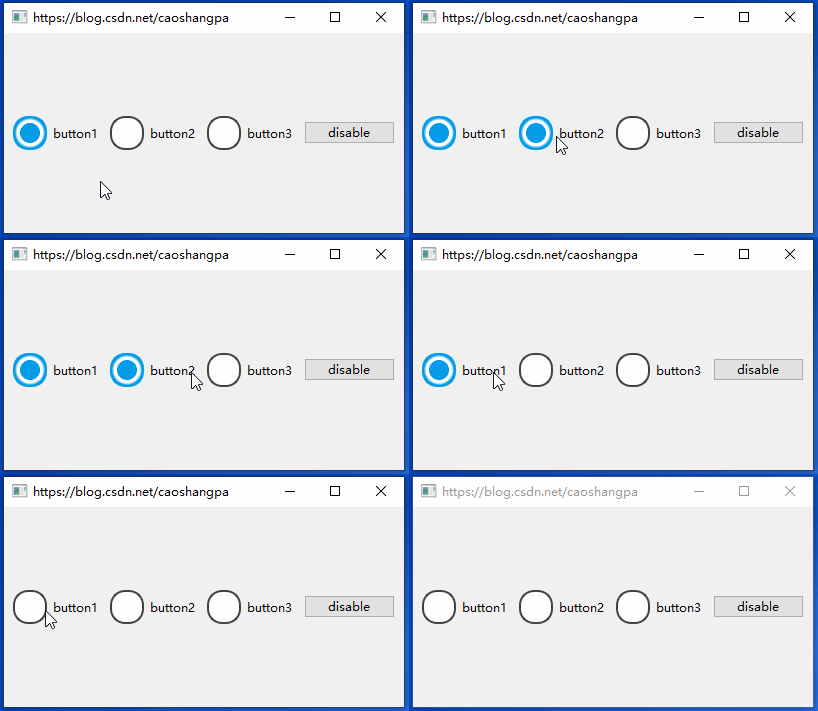
在“径向渐变”的C++代码中,将button1、button2和button3的互斥属性设置为false
button1->setAutoExclusive(false);
button2->setAutoExclusive(false);
button3->setAutoExclusive(false);

可以看到,我们用单选按钮实现了多选功能。但是最好不要这样做,因为我们要遵循众所周知的约定,单选按钮的作用就是单选。如果要实现多选功能,建议选择复选框(QCheckBox)。
原文链接:Qt6入门教程 15:QRadioButton-CSDN博客
猜你喜欢
网友评论
- 搜索
- 最新文章
- 热门文章
